banner

Sunday, February 12, 2012

Bolognese Crepes

This post is about a very good tasting recipe we do at home. It involves rolling a crepe and put filling in the middle ... This suggestion is meat but it is super tasty stuffed with vegetables (tomatoes, courgettes, aubergine, onion) and also with cod.

This dish serves great as a side dish or even main one. Usually at home when I make it we have rice and salad next to it.


Bolognese

Ingredients:
1 onion - minced
2 garlic cloves - minced
500 gr minced beef
2 carrots - cut into small cubes
1 green pepper - cut into small cubes
1 cup of green peas
2 stalk to celery - cut into small pieces
3 tomatoes - peeled and juiced
2 tbsp of tomato paste
3 tbsp of oil
Salt and pepper

Method:
Heat oil in a deep pan and fry for 5 minutes the onion and garlic. Pour in the beef and fry for around 5-8 minutes until cooked. Put in all the rest of the ingredients. Season with salt and pepper and let them cook for a while.

For the Crepes

Ingredients:
1/2 cup flour
1 egg
3/4 cup milk
1/8 teaspoon salt
1 tablespoon butter (melted)

Method:
Mix everything in a large bowl.
Pour 1/4 cup of the mixture into a lightly buttered pan heated at medium.
Tilt the pan and turn so that the mixture evenly coats the entire bottom of the pan.
Cook the crepe until golden brown on the bottom, about 2 minutes.
Flip and cook the other side until golden brown.

Assembling the crepes:
After cooking all crepes - open up one by one and pour in a thick line in the middle of the bolognese recipe. Fold from both sides inward and then roll the crepe. Do this to all and assembly each one next to the other.

You can pour on the crepes a little of the bolognese recipe on top if you have remaining. And sprinkle with cheese / mozzarella and Parmesan fit great.

I also add most of the times bechamel sauce on them - you can find the recipe here

ENJOY!

Wednesday, January 25, 2012

Flan

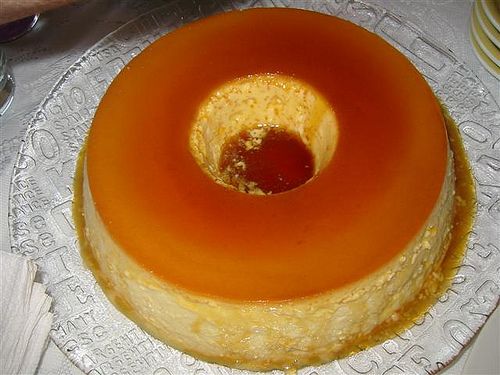
This delicious cold dessert is to die for!! Specially since it is sweetened with condensed milk, and this is the first time I add to it heavy cream..A Brazilian friend told me to add it and yummy, it turned out soo delicious!

Since this required a little more effort to prepare it, I thought of adding pictures to make it easier.

Prior to doing the flan, we have to do the caramel. So for this we need:

2 cups of sugar (regular, granulated)
1/2 cup of hot water

Lets start by putting the 2 cups of sugar in the flan form which is usually the one with the hole in the middle and heat it to let it melt. What worked for me is to increase the heat and decrease it every once in a while, I would increase it and the sugar would start melting and the low heat would allow them to settle and melt the rest. Do what works for you!


After all sugar has melted, step away a little from the pan and pour the hot water. Be careful because it will boil and maybe splash around. Few second and it will calm down. Keep whisking.


Once it reached below picture, spread around the caramel. You can do this by moving the pan in circular motion or maybe using a brush or a spoon.

Now we get to do the Flan.

Ingredients
2 cans of condensed milk
2 cans of milk (measure with the condensed milk can)
200-250ml of heavy cream
3 eggs
1 tbsp of corn flour

Method
Preheat oven to 200 degrees C. Blend all ingredients. Pour them on the caramelized form. Set
banhe-marie method and cover with aluminum foil and bake for 45min. Remove foil and bake another 15min until toothpick comes out clean.


Once cooked, put in the fridge for a minimum of 4 hours. I love leaving it overnight, and it is ok to leave it for a day or 2 before serving. Just slowing flip it on a big plate and here is the beauty!


ENJOY!!!

Thursday, January 19, 2012

Wilton Cake Decoration Course 1

My mother and I were taking course number 1 of Wilton Cake decoration. I must say that we did really enjoy it though it was so hard since I had to go after work directly and the course would take 3 hours, twice a week, for 2 weeks. I would be at home around 8:30pm! Anyway, the course is done! and we did learn so many things!!

We learned how to do icing, and their consistencies, and where to use each. We did stick to only 1 recipe for butter cream, which is the one in the book they gave us, but I will be trying later other recipes that I have seen around.

Below pictures are the final projects my mom and I did! And I must say they turned out so beautiful! :)

This was the cake I made! I had to do the flowers a day before and leave them to dry out. It turned out beautiful!


This is the gorgeous cake my mom made! The flowers are so beautiful!


And these are all the cakes of the class! We did enjoy it and I am taking into consideration taking the other courses 2 and 3 later on! If you have Wilton classes available where you live, you should go ahead and take them, you will learn a lot!


Sunday, January 15, 2012

My niece's welcome party!

Want to post few pictures of my niece's welcome party! She's my first niece ever, and she's gorgeous! She's 3 weeks old now <3

I will post later recipes of few of them following this post..!

This cake was done my by mom! me and her are taking this Wilton decorating class and this is what she did last time! I will post about my cakes later on as well!

Mini Cheesecakes..
How cute are these???


These are brigadeiros but in a mini cup!


Passion fruit mousse, delicious!

Saturday, January 7, 2012

Banana Chocolate Chip Muffin


These muffins are so easy and delicious to make. I decided to make these for my son to take it to his nursery. They freeze so well too! Just wrap each one with transparent paper (this is what I do). This recipe is one of the good ones to use when we find ripe bananas around the kitchen and we don't know what to do with them! :)

Ingredients
  • 3 or 4 ripe bananas, smashed
  • 1/3 cup melted butter
  • 3/4 cup sugar
  • 1 egg, beaten
  • 1 teaspoon vanilla
  • 1 Tbsp espresso or strong coffee (optional)
  • 1 teaspoon baking soda
  • Pinch of salt
  • 1 1/2 cup of flour
  • Chocolate chips (I used around half cup)
  • Walnut to decorate (optional)


Method

No need for a mixer with this recipe.

Preheat the oven to 180 C. With a wooden spoon, mix butter into the mashed bananas in a large mixing bowl.

Mix in the sugar, egg, espresso and vanilla.

Sprinkle the baking soda and salt over the mixture and mix in.

Add the flour, mix until it is just incorporated. Fold in the chocolate chips and put a walnut on top of the muffin.

Pour mixture into a prepared muffin tin. Bake for 25-30 minutes. Check for doneness with a toothpick inserted into the center of a muffin. If it comes out clean, it's done. Cool on a rack.

Makes 12 muffins.

ENJOY!!

Monday, December 19, 2011

Rolled Fish Fillet


Ingredients
3 fish fillet
Green, red and yellow pepper thin sliced
1 onion, thin sliced
Salt
Pepper

Method:

Wash well the fish fillet and place them in a clean surface. Cover them with a transparent paper and start thinning it by pounding it softly with a meat mallet until looks like in the picture.
Cut it in half since it will be big and place in the middle strips of onion, and peppers as you desire. If you wish, you can add other veggies like carrots, etc.

Roll them up and place them next to each other in the baking pan.

Now for the sauce:
2 medium tomatoes
3 bunches of cilantro
2 garlic cloves
Condiments as you like as: salt, pepper, red pepper, cumin, paprika, etc.
1/4 cup lemon juice
If you want it to have spicy flavor you can add chilli
4tbsp Canola Oil

Method:

Blend them all together and pour them on the rolled fish fillets. Decorate them dish with slices of lemon just like shown in the picture and bake between 30 and 50 minutes.


Very good with white rice on the side!

ENJOY!

Sunday, November 20, 2011

Lasagna Bolognese

Lasagna with rich beef red sauce, easy to be done and delicious too. You can freeze trays if you would like to and they can sit for up to 3 months in the freezer - a very quick lunch to grab from the freezer and heat up in the oven.


Ingredients

3 tbsp oil
1 onion diced

3 garlic clove minced

500gr minced meat

2 carrots shredded

1 cup of green peas

1 green pepper

1 red pepper (optional)

4 tbsp tomato paste

Salt

Dried or fresh basil - chopped


Bechamel sauce
1L milk

4 tbsp flour

2 tbsp butter

Salt

Nutmeg


Lasagna box

Mozarella cheese


Method

If you buy the lasagna that needs to be boiled first, do so before anything following the instruction. If you buy the one that does not need to be cooked then leave for later use.

Heat oil in a deep pan, and add the meat with the onion and garlic. Cook for around 10 min. Once cooked, add carrots, green peas, green pepper, red pepper. If you want you can add mushroom, even corn. Cover and let it cook for 8 minutes. Add salt and basil plus the tomato sauce with around 1 cup and half of water. Let cook for 2 minute and turn off.


For the bechamel, I mix the flour in the cold milk and bring to boil. Then add the butter and the nutmeg plus the salt. Super easy.


Before assembling the lasagna, heat oven to 200 degrees C.


For assembly, put a little of bechamel at the bottom, then layer of lasagna, then bolognese sauce, bechamel, pasta, bolognese, bechamel, and so on. At the end, pout mozzarella cheese on top.


Bake for 30 minutes, and stick a fork to see if the lasagna has been cooked in case you used the type that doesn't need to be cooked. If its soft, bring to broil to allow the cheese to have this brown beautiful color.


ENJOY!


Thursday, November 3, 2011

Potato Gratin


Ingredients

1kg potatoes
2 cups of milk
1 1/2 tsp salt
Grated nutmeg
1 clove of garlic - mashed (you can omit this if you don't want garlic in it, but it gives nice taste)
2tbsp AP flour
3 tbsp of finely chopped green onion
1/2 cup of heavy cream
Shredded mozzarella cheese for topping

Method

Peel potato, wash them and slice them evenly measuring 5mm.

In a pan pour the milk, salt, nutmeg, mashed garlic, and flour - whisk them, and bring to boil until thickens.

Scrub a baking form with butter, and put at the bottom a line of potatoes. Organize them nicely so that the finishing product turns out nice! So a line of potato, sprinkle green onion, put half of the cream on it then put the milk mixture on it, and continue doing another layers until done.

Once all layers are done, bake at 220 C, covered with aluminum foil for around 20min (Pinch the potatoes with a tooth pick to see if its done), then take out the foil and sprinkle the cheese. Bake another 5 minutes.

Delicious, and simple!

ENJOY!
Related Posts Plugin for WordPress, Blogger...